Showing posts with label Root. Show all posts
When it comes to rooting Android devices, Chinese developers must play a
crucial role on developing. Now the developers come up with another
mesmerizing Android root app called Kingroot. In this guide I would like to talk about the process of – download Kingroot APK english version 4.0/4.1
for PC/Android on windows 8/10/8.1/7 & more operating systems
support. This is a one click root app now specially developed for
Android users. They have introduced this app to the market with lot of
perfection, Compatibility & great user navigation.
Firstly, this app was released on Chinese language. Later on, we have found a great way to download Kingroot APK 3.5.0 Download For Android/PC in English version. It
is now one of the great & most downloaded app around the globe. It
is very simple to use this app on your windows PC or Android. Just
connect your Android device with a USB & just a click to root the
device without any errors. Other root software may need supporting
softwares but Kingroot is one software go. 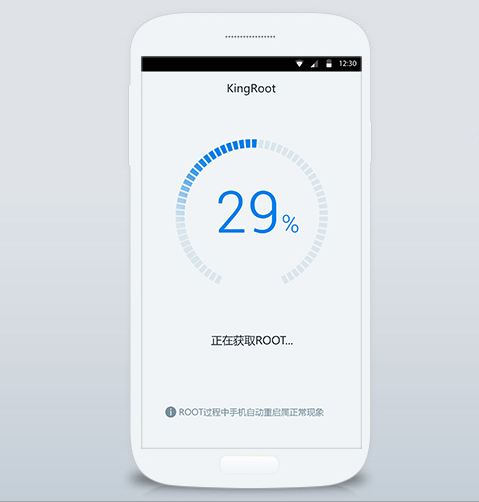
Kingroot APK For PC and King root on Android
Before going to direct download link of Kingroot APK, Let us first know some key features & facts of this app. There are of hundreds of rooting apps are available in the market then what gives best votes to this Kingroot to dominate other apps.
Here are the best features of Kingroot APK on Android/PC.
Download Kingroot APK 4.50 For Android
It is a mandatory APK, you should have on your device to perform rooting actions to your Android. I have been using this application since it is released. Now I’m going to give official download link & installation tips to Kingroot app for Android.- Download Kingroot.APK for Android from – here | english apk here
- If you downloaded this file on PC then transfer this app to Android via USB cable or Bluetooth.
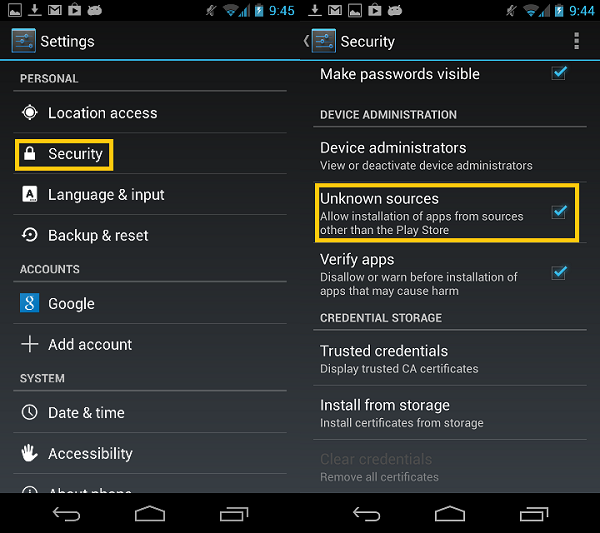
- Now on your Android mobile, Go to Settings > Security > Unknown sources & Check Allow other sources to install files.
- If you directly download the app from Android mobile then go to downloaded location and click on that APK file.
- If you transfer the file to Android then also you have to go to the location to where you transferred the file & tap on it.
- Now Click on Install & Next and wait for sometime to get it installed on your Android.
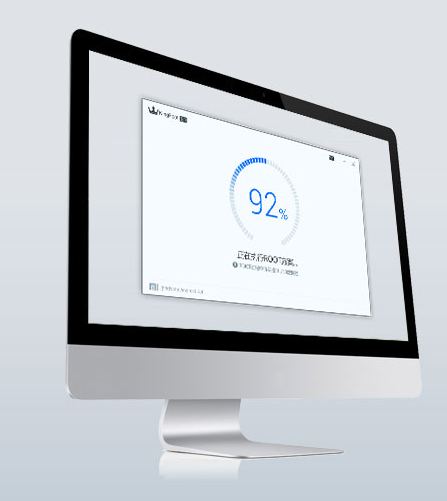
Download Kingroot For PC on Windows 7 and 8/8.1/10
Now I’m going to give you an official link to download Kingroot For PC .exe file. Please see the below link to download Kingroot on Windows & installation guide.- Direct download link for kingroot.exe is here
That was the complete tutorial to Download kingroot APK for Android and PC. I hope you have downloaded that file & installed it perfectly. Please feel free to contact me via comments if you have any trouble with this app.Thanks for reading this guide.
The OnePlus One is a pretty awesome phone. Especially after the Nexus 6 turned out to be an overpriced monster. And now, it’s also relatively easy to acquire. There’s an open sale every week and invites are easier to get. I like to say that OnePlus One is the new Nexus. It’s a mid-range phone with flagship-level specs and it’s really easy for geeks to tinker around. Rooting is easy. You’ll find lots of awesome custom ROMs and mods for the phone, and it has a thriving developer community.

But before you can do any of that, you need to gain root access. For that, you need to flash a custom recovery, which means you need to unlock the Bootloader. It’s an easy affair. Shouldn’t take you more than 30 minutes if you follow the guide below closely.
Alright, let’s get this bad boy off its leash.
1. What You Need to Know Before We Start
This guide is for a OnePlus One running KitKat (4.4.4).
The process of rooting requires you to unlock your Bootloader. And unlocking the Bootloaderwill completely wipe your device (btw, we recently wrote how to do that manually if you intend to sell your device).
So please, before we begin this process, back everything up – contacts, SMS, photos, everything.

Got root?
Also, make sure your phone is more than 50% charged and your Windows PC/laptop is plugged into a power source.
2. Setups and Downloads
Here’s an overview of what you’ll need.
- Android SDK, including Fastboot
- ADB drivers
- Recovery file (TWRP)
- SuperSU file for rooting
Step 1: First, you need to download the Android SDK. A slimmed down version of just the things we need are available here. It’s a 1 MB file. Click the Download Now button to download the file (not the Download button).

Once the zip file is downloaded, extract it to the Desktop.

Step 2 (Optional): If for some reason the slimmed down SDK doesn’t work for you, go tothis site to get the full SDK. On the site, scroll to the bottom of the page, select Download for other platforms -> SDK tools only.
After downloading, go to the android-sdk-windows folder and run the SDK Manager file. During the installation process, choose the following packages.
- Tools -> Android SDK Tools, Android SDK Platform-tools
- Extras -> Android Support Library, Google USB Driver
You should now see a new folder called platform-tools.
Step 3: Download and install Universal ADB Drivers. If it doesn’t work, check out the alternative method here.
Step 4: Download the TeamWin Recovery Project (TWRP) recovery file (get the latest one) and the SuperSU file for root.
3. Unlocking the Bootloader
We’ll begin by unlocking the Bootloader. This removes the protection from the internal memory. Without removing this restriction, we can’t install a custom recovery or gain root access.
Again, unlocking the Bootloader will wipe everything from your phone.
Step 1: Turn off your phone by holding down the power button and selecting Power off. Then boot into Fastboot mode by holding Volume up + Power.

The phone will display text saying Fastboot Mode, as you can see in the image below.

Step 2: Connect your phone to the PC using the USB cable that came in the box. Go toDesktop -> android-sdk-windows -> platform-tools.
Step 3: Press the Shift key and right-click in the open space in the window and select Open command window here.

Now, to check if ADB is installed correctly and is working, type in the following.
adb version
If you see the version number that means we’re good to go. Or else you’ll need to install ADB again.

Enter the following command to check if your phone is being recognized by your PC. If you don’t see the serial number, it means there’s some issue with the drivers or your phone is not connected to the PC properly.
fastboot devices
Step 4: Now we’re going to unlock the Bootloader. It will only take a couple of seconds. Enter the following command.
fastboot oem unlock
After the process is complete, it’s time to reboot the phone.
fastboot reboot
And that’s it. You’ll see the Android setup screen when the phone is booted. Get to it and set up your phone. Next, install the custom recovery.
4. Installing a Custom Recovery
Before we can install a custom recovery, we’ll need to do two things. Enable USB debugging and disable CM’s recovery protection.
Go to Settings -> About phone -> and tap the build number 7 times. This will open up theDeveloper options.

Go to Settings -> Developer options -> Enable USB debugging.
From the same screen, disable Update recovery with system updates. This is very important.

Step 1: Again, turn the phone off, put it in Fastboot mode and connect it to the PC.
Step 2: Go to the recovery file we downloaded at the beginning and rename it to recovery.img. Copy the file to the platform-tools folder.

Important: Here, .img is the extension. So when editing the name of the file, all you need to write is recovery.

Step 3: Shift + right-click in the folder and open the command prompt there.
To install the custom recovery, enter the following command.
fastboot flash recovery recovery.img
Once that is done, reboot your device.
fastboot reboot

5. Rooting OnePlus One
Now that the custom recovery is installed. It’s time to root the phone.
Step 1: Connect the phone to the PC and transfer the SuperSU file to the root folder on the OnePlus One. Now, disconnect your phone.

Step 2: We’re going to go into TWRP (pronounced twerp) custom recovery now. Power off your phone and boot it up while holding Volume down + Power.
Step 3: Once you’re in the custom recovery, click Install. Scroll to look for the SuperSU file and tap it.

Step 4: You’ll then see another screen. Just swipe for confirmation.

Step 5: Once the process is complete, tap the Reboot System button to reboot.

After the phone is rebooted, you’ll see a SuperSU app installed on your phone.
If you want further confirmation that your phone has indeed been rooted, download an app called Root Check.

Enjoy the Freedom
That’s it. You’re rooted. The world is now your oyster, my friend. Install a custom ROM, block all kinds of ads, or just stay stock, use Xposed and install some awesome mods.
Motorola recently pushed the Lollipop update to their Moto G 2 2014 devices and things didn’t really go as planned. From the stripped power menu to dual SIM data bugs, there have been some issues that has caused some outrage among Moto G loyalists.
The best way out of such a situation would be to install a better custom ROM or to go back to the stock 4.4.4 Kitkat build. But all that requires an unlocked Bootloader. So first let’s see how to unlock the Bootloader on the device and then we’ll look at installing custom ROMs.

Warning: This process will completely wipe your device, including the internal SD card. It’s recommended to take a complete backup of the device before you proceed. Also, once your bootloader is unlocked, the warranty of your device will no longer be valid. Continue at your own discretion.
The Essential Setup
- Install the Motorola USB drivers for your device if you haven’t installed them already. You can follow the link to get the driver installer file for Moto G 2014 edition.
- Download and install the Minimal ADB and Fastboot files on your computer. Make sure you install it on your desktop for easier access.
- Make sure the device is at least 60-70% charged before you proceed.
- Unmount the external SD card, if any, from the device and remove it. Once the bootloader is unlocked at the end, you can use the card again.
Unlocking the Bootloader
Step 1: Power off the Moto G 2014 and place it in Fastboot mode by pressing and holding the power and volume down buttons simultaneously.
Step 2: Now connect the phone to the computer and wait for the necessary drivers to be installed.

Step 3: Now open the folder where you installed ADB and Fastboot files, hold shift and right-click. In the context menu, click on the option Open Command Prompt Here.
Step 4: Type in the command fastboot oem get_unlock_data. Once that’s done, you will get a string of code. Copy and paste the code in a notepad without any extra spaces or blank space. The entire code should be in one single line.

Step 5: Now open the Motorola website and register yourself. It’s necessary to get the unlock key of the device on your email. Once you register, scroll to the bottom of the page, type in the unlock data, and request an unlock code.

Step 6: If your device can be unlocked, you will receive an email within a few minutes with the unlock code. Copy the unlock code, open the command prompt and type in the commandfastboot oem unlock <unlock_code>.
You will get a warning on the device about unlocking the bootloader. Confirm the action to successfully unlock the bootloader. The phone will reboot with everything wiped. You may now insert the external SD card and restore your device.
Want to lock down? If you ever would like to lock your bootloader again, you can type in the command fastboot oem relock in Fastboot mode. But just to make things clear, manually re-locking the device doesn’t patch the warranty.
Installing TWRP Recovery and Rooting the Device
If you are looking forward to rooting your device or installing custom ROMs, you must install custom recovery like Clockwork or TWRP. I prefer the latter because of its interface. Download and save the TWRP flashing file in the fastboot folder and boot the Moto G in Fastboot mode (hold volume down+ power button). Plug the device into the computer and wait for it to be detected. Now open the command prompt in the Fastboot ADB folder and execute the command fastboot flash recovery TWRP.

Reboot the device and copy the SuperSu zip file to the internal SD card. Open the Bootloader mode and navigate to recovery. This time you will be taken to the TWRP recovery home screen. Finally, flash the SuperSu zip file and your device will have the root access.
Conclusion
So that was how you can unlock the bootloader of the Moto G 2014. Unlocking the bootloader is essential if you are planning to root the device or install custom ROMs. In case of any doubts, please ask them in the comments section.
If you can cope with the massive 5.5” display, the Redmi Note is one hell of a device. At just INR 9,999 it’s a real steal. We’ve already done a comprehensive review of it, do check it out.

Now about the device, when you unbox it, it’s like Bruce Banner. It has immense power, but all that’s running on a limited mode. If you really want the Hulk in the device to come out, rooting is the way to go. With the device rooted and Xposed framework installed on it, you can do so much more.

So if you are in, let’s have a look at how we can root the device.
Statutory Warning
So before be begin, I just want you to know that even though we have taken utmost care to make the rooting process very easy for our readers, there’s always risk involved. So only those who are strong at heart and really want to unleash the full potential of their device should continue. If you end up bricking your device then don’t blame us.
Rooting the Redmi Note 4G
The very first thing you will have to do is back up your device. Even though the process is not supposed to wipe your phone or delete any files on your SD card, it’s good to do just in case. It’s always advisable to take backups before messing with system files. Also make sure your device is at least 60% charged.
Now download and copy the Root Zip file (Rootonly_beta.zip) to the device’s internal memory. If you need to verify at all, the MD5 checksum of the file should be D7A2FDF64392F549491CC93467EC4E67. Now open the Updater app, usually found under the tools folder, and press the Menu button.
")
")
Here, select the option Update Package, choose the Rootonly_beta.zip file that you downloaded on your SD card, and install the file. Your device will now reboot and once it reboots successfully, it will be rooted. However, you will have to enable the root permission from theSecurity settings to use it.
")
To get that done, open up Security and navigate to the Permission settings. Here, turn on the option that says Root Permission and confirm any security popup message that you might get.
Once everything is set, you can go ahead and install the Xposed Framework Module. If you have any doubts regarding it, refer to our guide on how to install it on rooted Android devices.
")
")
Note: MIUI doesn’t work with the traditional SU apps and manages the root permissions for the app from the built-in settings.
So that was how you can easily root your Redmi Note 4G LTE device. You can use a nifty app called the root checker to check if you have root access on your device.
")
Keep in mind: Once your Redmi Note 4G is rooted, you will not be able to receive any official OTA updates. To receive them, you will have to first unroot your phone.
Unrooting the Device
To unroot the device, simply flash the unroot.zip file using the Updater app as done while rooting the device and reboot.
That was about rooting (and unrooting) Redmi Note 4G. If you have any doubts regarding the procedure or the MIUI environment or any questions you would like to ask me about the device, mention them in the comments.
 |
Previously I showed you the best way to record your Android phone’s screen on KitKat. For that your phone needed root access, an AOSP custom ROM, and Xposed Framework. And that really was the easiest and the best way to do it. It really shouldn’t be this hard. The reason why it was so complicated was because of Android KitKat’s own flaws.
Screen recording, how hard can it be?
Thankfully someone in Mountain View listened and has made this process a lot simpler for Android phones running Lollipop. The best thing? You don’t even need to be rooted anymore.
Now that things are easier, a lot of applications have propped up on the Play Store. Today we’ll take a look at two free applications. A simple one and a feature rich option.
1. Lollipop Screen Recorder
Lollipop Screen Recorder is as easy as it gets. The app shows no customization options, no settings. It will capture the screen only in the device’s native resolution. If you want to capture video in landscape mode, switch to it before starting the recording. The app is so bare, there’s not even an option to record touch points.


You start the recording by pressing the shutter button on the top-right corner. You end up by pulling down the notification drawer and clicking the Stop button.
AZ Screen Recorder – No Root
AZ Screen Recorder is the total opposite. When you tap the app’s icon you just see a floating widget. You can tap the shutter key to start recording then and there. But I suggest you tap theGear icon to go into settings first.


Here, specify the resolution and the bit rate for the video you want to capture. If you want to save on size, choose something low res.
From the settings screen you can specify if you want to enable touch points, limit the length of the video, and even choose where the video gets saved.


When you’re done with the settings, go back, tap the app’s icon and select the shutter key to start recording. You can go to the notification drawer to stop or pause the recording.
My Experience with These Apps
There’s a night and day difference between screen recording in KitKat and Lollipop. Not just in the process of recording the screen, as I’ve mentioned above, but in the quality of the capture as well.
On KitKat, even after jumping through all the hoops, the video capture wasn’t always smooth. You’d find stutters sometimes. It wasn’t so bad that you just couldn’t use it but it was far from optimal.
Worth It: If you’re a developer, a reviewer, or someone who finds themselves constantly in the need to record their screen, the upgrade to Lollipop is going to be worth it just because of this.

How Do You Like Lollipop?
As you’re reading this I assume you already have Lollipop installed. That makes you one of the few lucky users.
What do you think of Lollipop so far? How do you like Material Design? It’s a bit too flashy for my taste, but it’s not something I can’t get used to. Leave your views in the comments below.

Scroll away on your Android today.
Modified Image including work by Steve Cukrov via Shutterstock and Android via Developers.
Modified Image including work by Steve Cukrov via Shutterstock and Android via Developers.
Sometimes, life feels so hard. Computers are still computers, not robots. You still have to give them commands. Sure, you can automate some software, but you still need to set it up first.

All these #firstworldproblems up in my business.
I mean, we’re getting there. It’s starting to be possible to control lights from your phone, turn on your house’s heating from anywhere, and have the garage door open automatically when you get home.
Reading on smartphones is getting better as well. Unfortunately there’s no robot to automatically infuse all the knowledge in the world into your brain. But there’s Kindle to make reading, even on web pages less of a strain for your eyes. When faced with the reading blues, you can always use text-to-speech and have your smartphone read the text to you.
The Android world is kind of spoiled in a way. The open nature of the OS lets developers, even novice developers build one-off or really specific problem solving apps. We’re going to talk about two of those apps today.
Scrolling, how hard can it be?

Let me present you a scenario that’s straight out of an after midnight, low budget infomercial. You’re waiting for a train, you only have one hand free for some reason and because you’re part of the modern world, you have a giant ass phablet. The one that’s too big to carry around or actually use. But it has stellar battery life, so who cares.
So, you have one of these mythical devices and you’re trying to catch up on news. But holding a phone with one hand and scrolling with the same hand is almost impossible. You make one wrong move and your phone falls down onto the tracks. Just then the train passes and shatters your phone.
Congrats, you just lost an $800 phone. All because you couldn’t handle scrolling with one hand.
But what if you didn’t have to?
How to Scroll Automatically using Tilt Scroll

If you have a rooted phone (if not, I’m sorry you had to read this far, but in my defense it’s right there in the title), you can use an app called Tilt Scroll, which lets you scroll by tilting your phone backwards and forwards. And this isn’t just for web pages. This will work in any app where you’d normally scroll.


The app will require you to grant Superuser access. Once that’s done, go to the Activation tab and select the mode. You can have it permanently enabled or as a more sensible choice, activate it by using a shake gesture. There’s also a floating widget but it doesn’t seem that useful.
By default, holding the phone straight won’t do anything. Tipping the phone back will scroll down and tilting it forward will scroll up. The free app doesn’t let you customize anything.
If you want to customize the angle at which scrolling starts, the acceleration and more, you’ll need to buy the Pro version for $2. Seems like a small price to pay to avoid that train station disaster.
Alternatively, scroll using buttons: The developer of Tilt Scroll has another app called Smart Scroll Tools that doesn’t really live up to its name. The app’s UI and premise is the same. The only thing different is that instead of tilted scrolling, you get buttons to start and stop scrolling. And this isn’t a paginated jump from one point to another. It’s still the same boring slow scroll, only activated via a button instead of a flicking gesture. If you ask me, that’s not going to save you from the horrible train disaster.


Your First World Problems
Share with us your #FirstWorldProblems in the comments below. Ah darn, you need to authenticate before posting a comment, too much work.


